DTF transfers care and maintenance is essential for vibrant, durable garment graphics. A thoughtful DTF transfer care plan starts with selecting fabrics that promote strong adhesion, and you should consider fabric compatibility for DTF to avoid edge wear. Mastering heat press settings for DTF and proper curing helps ensure the ink and adhesive bind evenly, contributing to extending print life. Careful washing, drying, and storage practices protect color retention and minimize cracking and peeling. By establishing a simple, repeatable routine, you can deliver consistent results for customers or your own wardrobe.
In plain terms, this topic can be described as DTF print maintenance or garment graphic upkeep, focusing on print longevity and color stability. Other LSI-friendly phrases include fabric durability tips, heat transfer curing consistency, and wash durability to reflect related user concerns. To build a practical mindset, describe steps like selecting compatible fabrics, controlling heat and time, and choosing safe detergents in a way that matches common search questions. Ultimately, this approach helps readers find actionable guidance even if their wording varies, while maintaining the central goal of protecting the graphic and preserving garment feel.
Fabric Selection and Pre-Press Prep for Durable DTF Graphics
Selecting the right fabric is foundational to lasting DTF graphics. Natural fibers like cotton or cotton blends generally provide stronger adhesive bonding and color retention, while synthetic fabrics such as poly blends can also perform well when paired with a compatible adhesive and adjusted heat and time. Pay attention to fabric compatibility for DTF to ensure the bond remains strong through repeated washes and wear. Documenting fabric types and adhesive compatibility helps you deliver consistent results across batches and customers.
Pre-press and garment prep set the stage for durability. A short, consistent pre-press removes moisture, flattens the surface, and helps the adhesive bond evenly during final transfer. Start with a light press for a few seconds on the area to be pressed, aiming to reduce moisture and create a smooth surface without scorching the fabric. Uniform weave and fabric weight further stabilize transfer adhesion and minimize edge cracking or peeling.
Heat, Time, and Curing: Optimizing Heat Press Settings for DTF
The cure step locks ink and adhesive into the fabric, so precise heat press settings for DTF are essential. For most standard DTF transfers, use a controlled temperature range around 160 to 170 C (320 to 340 F) for roughly 10 to 15 seconds to activate the adhesive and set the print. Always consult the adhesive manufacturer’s guidelines and perform a small test cure on a sample, since some materials may require slight adjustments in temperature or dwell time.
During curing, avoid overheating the ink surface, which can cause gloss changes or color shifts. If gloss fluctuations appear after curing, adjust temperature or dwell time slightly based on a test piece. A quick post-cure check—such as gently lifting a corner to confirm a solid, uniform bond—helps verify that the transfer is protected against cracking or lifting in normal washing and wear.
DTF Transfers Care and Maintenance: A Practical Routine to Extend Print Life
DTF transfers care and maintenance is not a one-off step but a repeatable routine that grows with experience. A thoughtful approach—from pre-press through washing, drying, finishing, and storage—yields longer print life, better color stability, and stronger edge integrity. By following a structured care routine, you reduce peeling, cracking, and fading, while maximizing the life of the design across multiple wears and washes.
Adopt a simple maintenance schedule that includes regular checks of color vibrancy, edge integrity, and texture after cleaning cycles. Keep notes on fabric types and parameter settings so you can reproduce successful results. In practice, iterative testing—printing a small test piece, curing under planned conditions, and washing it multiple times—helps you fine-tune heat, time, and material choices for reliable, long-term performance.
Washing and Drying Best Practices to Preserve Color and Adhesion
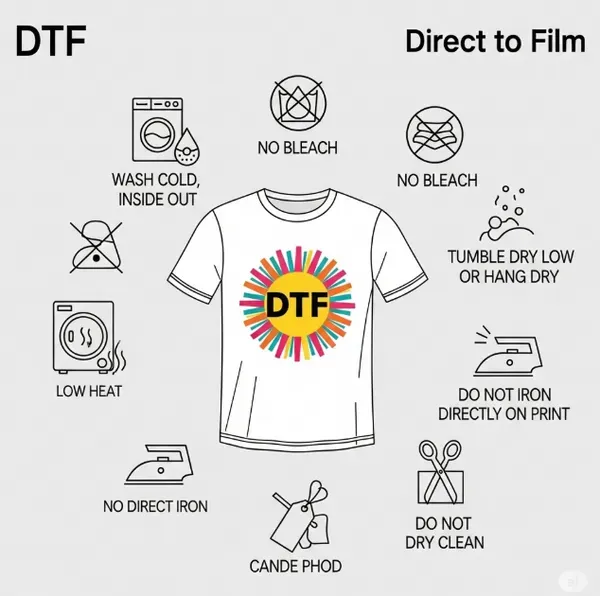
Garment washing is one of the most influential stages for preserving DTF graphics. Turn garments inside out before washing to minimize surface abrasion on the print, and use a mild detergent without bleach or harsh whitening agents. Cold to warm water settings, a gentle cycle, and reduced agitation help minimize wear on the adhesive layer and colorfastness over time.
Avoid chlorine bleach and fabric softeners that can degrade the adhesive and alter fabric texture. If softening is desired for hand feel, apply products away from the printed area or use water-based, dye-free options designed for colorfast graphics. After washing, air drying is ideal; if a dryer is necessary, choose low heat and remove promptly to prevent edge curl, gloss changes, or reduced adhesion at perimeters.
Post-Processing Finishes and Protective Coatings for Durability
Finishing touches can extend print life when chosen and applied correctly. A light protective top coat designed for textile graphics can enhance wear resistance and wash-fastness—provided it is compatible with the DTF film and ink system. If a top coat is used, verify the cure parameters and conduct a sample test to avoid unintended color shifts or stiffness.
Direct ironing on DTF transfers is not recommended. If smoothing is needed, place a protective cloth between the iron and the transfer and apply a brief, low-temperature press. For added protection, considering a compatible protective coating or sealant can help, but always test on a sample first to ensure it won’t crack, peel, or alter fabric hand feel. Troubleshoot common issues by re-curing or refining post-press finishing steps as needed.
Fabric Types and Ongoing Care Considerations for DTF
Different fabrics present unique care challenges for DTF transfers. Cotton fabrics generally provide excellent adhesion and color retention with standard adhesives and curing parameters, while polyester may require adjusted heat, time, or a more compatible adhesive designed for synthetic fibers. Blends are common and can offer balanced performance, but always validate the bond in a small test area before large production runs.
Documentation is key to consistency. Record recommended parameters for each fabric type you work with and maintain a protocol that standardizes steps from pre-press to curing and washing. This emphasis on fabric compatibility for DTF, plus a clear maintenance log, helps ensure uniform results across different garments and production runs, supporting reliable outcomes for customers and internal quality control.
Frequently Asked Questions
DTF transfer care and maintenance: how does fabric compatibility for DTF affect print longevity and adhesion?
Fabric compatibility for DTF is a major factor in overall DTF transfer care and maintenance. For best results, prioritize fabrics like cotton or cotton blends, which tend to bond adhesives more reliably, while validating compatibility for every fabric with your chosen adhesive and DTF system. Start with a short pre-press to remove moisture and create a smooth surface, then apply the transfer with the recommended heat and time. Document the parameters for each fabric type to reduce variables, minimize edge wear, and extend print life.
DTF transfer care and maintenance: what heat press settings for DTF optimize adhesion and extend print life?
Heat press settings for DTF should follow your adhesive’s guidelines. A common starting point is 160–170 C (320–340 F) for about 10–15 seconds. Always perform a small test cure to confirm bonding, and avoid overheating which can cause gloss changes or color shifts. If needed, adjust temperature or dwell time slightly based on a test piece. Proper curing ensures a secure, uniform bond that resists cracking or lifting through washing and wear.
DTF transfer care and maintenance: what washing guidelines help extend print life and prevent color fading?
Washing is crucial for extending print life. Turn garments inside out, use a mild detergent (no bleach), and wash in cold to warm water on a gentle cycle with low agitation. Avoid fabric softeners and chlorine bleach, as they can degrade the adhesive and graphics. Air dry when possible; if using a dryer, choose a low heat setting and remove promptly. If fading or edge issues appear after several washes, revisit curing parameters and consider a compatible protective top coat to improve wash-fastness.
DTF transfer care and maintenance: how does fabric compatibility for DTF influence pre-press, curing, and post-press care?
Fabric compatibility for DTF guides pre-press and curing decisions. Different fabrics may require adjustments in heat, time, and adhesive choice. Document tested parameters for each fabric type to ensure consistent results and reduce variability that leads to peeling or edge wear. A proper pre-press (to remove moisture and flatten the surface) combined with fabric-appropriate curing supports durable adhesion and longer print life.
DTF transfer care and maintenance: what troubleshooting steps help prevent edge lifting, cracking, or color migration during care routines?
Adopt a structured troubleshooting approach as part of DTF transfers care and maintenance. Run controlled test prints and cures on sample pieces, then wash to simulate production conditions. If you see edge lift, adjust cure temperature or time and re-seal edges if needed. For color migration, use gentler detergents and shorter wash cycles. Maintain consistency by comparing against a control piece and iterating on heat, dwell time, and fabric choice until results stabilize.
DTF transfer care and maintenance: which storage, drying, and handling steps best support extending print life between uses?
Proper drying and storage protect long-term durability. After washing, line dry or lay flat away from direct sunlight; avoid heavy creasing. If using a dryer, set to low heat and remove promptly. For blanks, store in a cool, dry place and away from humidity; finished garments should be stored flat or hung in a clean, dust-free environment. When finishing, avoid direct ironing on the transfer; use a protective cloth and consider a compatible top coat if your system supports it. These practices help preserve color, adhesion, and edge integrity over time.
| Aspect | What it covers | Practical tips |
|---|---|---|
| Pre-press and garment prep | Critical first step; removes moisture, flattens surface, ensures adhesive bonds; light pre-press; avoid scorching; reduces moisture pockets | Light pre-press area; test cure; verify fabric compatibility; align with standard fabrics and weave |
| Fabric choice and preparation | Natural fibers preferred; cotton/cotton blends bind adhesives better; poly blends can work with compatible adhesive and adjusted heat/time; verify fabric compatibility; uniform weight and weave improve adhesion | Use compatible adhesive; test on small area; check fabric weight and weave |
| Heat, time, and curing | Curing locks ink and adhesive; typical 160-170 C (320-340 F) for 10-15 seconds; consult guidelines; avoid overheating; test cure; ensure uniform bond | Follow adhesive guidelines; run small test cures; verify bond by lifting corner |
| Washing and care | Turn garment inside out; mild detergent; cold to warm water; gentle cycle; avoid chlorine bleach and fabric softeners; air dry preferred; low heat if dryer | Turn inside out; wash cold; use mild detergent; skip bleach/softeners; air dry; use low heat if dryer |
| Drying, storage, and handling | Line dry or lay flat; avoid direct sunlight; store garments flat or hung; protect from creases; low heat in dryer; storage for blank/finished garments | Prompt removal from dryer; avoid creasing; store in dust-free env; roll/flat storage |
| Troubleshooting and maintenance routines | Regular checks for color vibrancy, edge integrity, texture; test after extra washes; reseal edges or adjust cure; extend cure for stiffness | Build routine; document checks; perform controlled tests; compare to control; adjust parameters |
| Ironing, finishing touches, and protective coatings | Ironing not recommended; use protective cloth; low temp; optional top coat to protect from wear; ensure coating compatibility | Test top coat on sample; ensure compatibility |
| Fabric types and ongoing care considerations | Cotton offers good adhesion/color retention; polyester may require heat/dwell adjustments or compatible adhesive; blends common; validate bond in small area | Document recommended parameters per fabric type; ensure consistent routine across fabrics |
Summary
DTF transfers care and maintenance is a disciplined, ongoing practice that extends print life and preserves color and adhesion across fabrics. From pre press to washing, drying, finishing, and storage, a thoughtful routine reduces peeling, cracking, and fading while maintaining the garment’s feel. Choosing compatible fabrics, following precise curing guidelines, and applying smart post-processing and storage practices help deliver consistent results for customers or personal wear. When you document parameters, test new materials, and refine your process, you build reliability and value in your DTF transfers, achieving durable, vibrant graphics that hold up to real-world wear and laundering.

