DTF transfers have transformed how crafters and garment decorators add vibrant, durable designs to fabric, offering versatility and relative ease of use. If you’re new to this method, you can explore DTF printing for beginners and still achieve professional results on tees, hoodies, bags, and more. This introduction highlights what you’ll learn, from selecting DTF film and printing settings to adhesive powder handling and final pressing. You’ll discover how to apply DTF transfers on a range of fabrics, the role of DTF transfer film, and practical heat-press tips for consistent results. With clear steps and care guidance, this overview sets you up for DIY DTF on fabric, proper curing, and protecting colors during washing.
In other words, this direct-to-film approach to fabric decoration lets you print vivid designs on a coated film and transfer them to apparel with heat. Think of it as a film-based design transfer that combines digital printing with a curing powder and a hot-press step to embed color into cotton, blends, and more. Using this garment customization method, you can experiment with color, layout, and textures while keeping the process approachable for hobbyists and small makers. The technique relies on precise timing, temperature, and substrate compatibility, aligning with LSI principles by connecting related topics like pre-press, adhesive powders, and post-press care. If you’re exploring DIY DTF on fabric, you’ll want to understand the practical limits, from film choices to press settings, to maximize durability and wash-fastness.
DTF Printing for Beginners: Getting Started with Design and Film
DTF printing for beginners introduces a flexible workflow that blends digital design with film-based transfers. Start by crafting a high-resolution artwork, choosing a compatible DTF transfer film, and mirroring the image so it reads correctly after pressing. A basic setup includes a printer that supports white ink for DTF and the right media to help ensure vibrant colors and durable results.
In this beginner-friendly setup, keep designs simple and avoid overcrowding. Understanding the DTF transfer film—how it carries the printed image and the role of the carrier sheet—helps you plan your DIY DTF on fabric projects with fewer surprises. As you practice, you’ll refine print settings, experiment with fabrics, and learn how to apply DTF transfers more confidently.
Artwork Prep and DTF Transfer Film: From Design to Print
A smooth DTF workflow starts with artwork prepared for the garment. Optimize resolution, color balance, and decide whether you need a white underbase for dark fabrics. Selecting the right DTF transfer film matters for image clarity and wash durability, and it should be compatible with your printer and ink system.
Mirroring the image for the final read is essential, and testing a small swatch helps you preview how the design translates to fabric. This phase aligns with the broader topic of DTF printing for beginners and lays the groundwork for how to apply DTF transfers later, keeping colors vivid and edges sharp as you move toward the press stage.
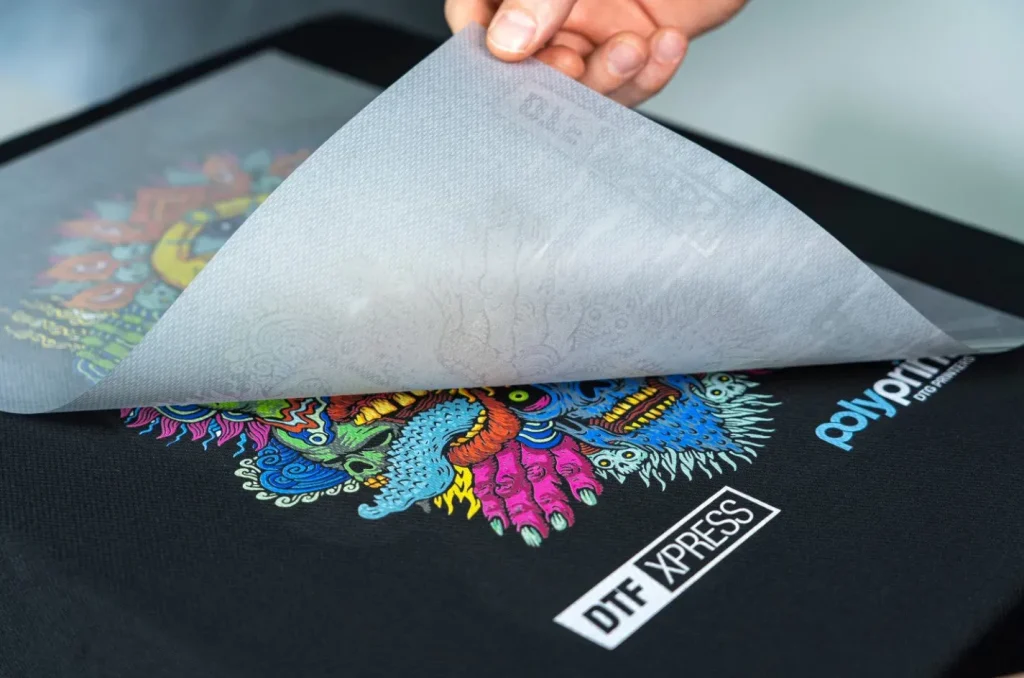
How to Apply DTF Transfers on Fabric: Alignment, Pre-Press, and Pressing
With your design printed and the adhesive powder prepared, focus on accurate alignment and a solid pre-press setup. Place the DTF transfer on the garment using a grid or ruler for precision, cover with a protective sheet, and pre-press briefly to remove moisture and create a smooth surface. This step reflects the core idea of how to apply DTF transfers and helps prevent puckering near seams.
A careful first press seals the transfer to the fabric; use the correct heat, time, and pressure, and monitor edges to avoid ghosting. As you gain experience, you can experiment with different fabrics and colors while maintaining even pressure and a steady pressing cadence, keeping the process aligned with an efficient DTF workflow and durable results.
The Adhesive Powder Step: Curing and Powder Handling for Durable Results
After printing, the printed film needs adhesive powder applied while the surface is tacky. Use a shaker to distribute a light, even coat, then bake or cure the powder according to your film’s instructions. Proper powder handling is crucial for durability and wash-fastness, a key facet of the DTF transfer film process.
Curing bonds the powder to the film so it won’t rub off during handling. A quick heat cure with a dryer or a brief warm-up in a heat press can be sufficient. If powder appears uneven, re-bake and recheck coverage before proceeding to the transfer stage to ensure a clean, professional result.
DTF Transfers Heat Press Tips: Temperature, Time, and Peel Methods
Pressing is where the image finally adheres to the fabric. Use typical DTF transfer temperatures around 160-180°C (320-356°F) and press for 15-20 seconds with firm, even pressure. Different film brands may require adjustments, so consult the film guidelines and tailor dwell times for light versus dark fabrics. These DTF transfers heat press tips are essential for consistent outcomes.
Consider whether to peel warm or cold depending on the film and ink underbase. A warm peel can speed up workflow and reduce ghosting, while a cold peel can help with slower-release designs. Protect the design with a Teflon sheet and maintain steady pressure across seams or textured areas to achieve a clean, durable finish.
Care, Troubleshooting, and DIY DTF on Fabric Projects
Care after application matters for longevity. Wash inside-out in cold water, avoid high-heat dryer cycles for 24-48 hours, and use a gentle detergent to protect the print. Following post-press care tips helps your DIY DTF on fabric projects stay vibrant longer and reduces edge lifting.
If you encounter issues like edges lifting or dull imagery, troubleshoot by adjusting curing time, press temperature, and dwell time for your specific film. Re-press with a clean cover sheet and re-test on a fabric swatch. This phase invites experimentation with different fabrics and designs while preserving color fidelity and durability.
Frequently Asked Questions
What are DTF transfers and why are they popular for beginners in DTF printing for beginners?
DTF transfers are designs printed on a special film with an adhesive powder that bonds to fabric when heated. They’re popular for beginners because the process is straightforward, versatile across fabrics, and produces vibrant results with fewer steps than traditional screen printing.
How can you apply DTF transfers to fabric correctly?
Prepare the artwork and mirror print on DTF film, then apply and cure the adhesive powder. Pre-press the garment, align the transfer carefully, and press at about 160–180°C (320–356°F) with firm pressure for 15–20 seconds. Peel the carrier warm or cold as directed by your film, then follow with post-press care.
What is DTF transfer film and how does it influence results?
DTF transfer film is the printable carrier that holds your design on film before transfer. The film, together with properly cured adhesive powder and correct print settings, affects color brightness, durability, and wash-fastness of the finished transfer.
What are essential DTF heat press tips for best results?
Pre-press to remove moisture and use a protective sheet (Teflon/silicone). Set the heat press to the recommended temperature (often 160–180°C) and apply firm, even pressure for 15–20 seconds. Use the appropriate peel method (warm or cold) as advised by your film and fabric.
How can I do DIY DTF on fabric at home?
DIY DTF on fabric starts with printing a mirrored image on DTF film using a suitable printer and white ink, then applying and curing the adhesive powder. After pre-pressing the garment, align the transfer and press per film guidelines, then peel and finish with proper post-press care.
How should you care for garments after applying DTF transfers?
Wash the garment inside-out in cold water and tumble-dry on low or line-dry to extend the transfer’s life. Avoid ironing directly on the print; use a protective sheet if ironing is necessary, and follow the film’s curing and care recommendations.
| Aspect | Key Points |
|---|---|
| What DTF transfers are and why beginners love them | DTF transfers are versatile, easy for beginners, and produce vibrant, durable results with fewer steps than traditional screen printing; suitable for T-shirts, hoodies, bags, and other fabrics. |
| Artwork prep and film selection | Use a high-resolution design; consider white ink underlayers for light/dark fabrics; mirror the image; choose a printer/white ink option that supports DTF workflows. |
| Adhesive powder application and cure | Apply a light, even coat of adhesive powder while the film is tacky; shake off excess; allow moisture absorption; cure/bake per film instructions to ensure durability and wash-fastness. |
| Pre-press and fabric considerations | Pre-press garment for 5–10 seconds to remove moisture; works on cotton, poly-cotton blends, and various fabrics; align with a grid or pressing pillow for accuracy. |
| Transfer alignment and heat press setup | Place transfer on garment, protect with a sheet, align carefully, and preheat area ~5–10 seconds for readiness. |
| Press time and temperature | Typically 160–180°C (320–356°F); 15–20 seconds; adjust for dark fabrics (15s light, 20s dark) and film-specific requirements. |
| Peel method | Cool slightly before peeling; can be warm-peak or cold peel depending on film; warm peel often reduces ghosting. |
| Post-press care and troubleshooting | Cool before handling; wash cold inside-out; avoid high-heat dryers for 24–48 hours; re-press if edges lift or image dulls; adjust time/temperature as needed. |
| Care and maintenance | Wash cold, tumble dry low or line-dry; avoid ironing directly on print; use a cover sheet if ironing is necessary. |
| Fabric and color considerations | DTF transfers work well on cotton and blends; use a white underlay for dark fabrics; adapt pressure/dwell time for stretchy or textured fabrics. |
Summary
Conclusion

